
Lorem ipsum dolor sit amet, consectetur adipiscing elit. Duis dapibus rutrum vulputate. Mauris sed eros nec est vehicula mattis ac vitae ligula. Maecenas vitae tristique sapien, vitae pellentesque lectus.
Ski Touring Equipment Guide: Skis, Boots And Bindings

Guide Summary
Skiers need the right gear to navigate the extensive terrain beyond the boundary line. For touring, this includes specialized boots, skis, and bindings that facilitate downhill skiing and uphill ascents. Modern touring equipment allows enthusiasts to maintain a one-ski quiver with boots and bindings that quickly switch between traditional alpine setups and uphill configurations. Some touring boots and bindings are designed for lengthy tours, while others balance downhill performance and uphill efficiency. Use this guide to help identify your priorities when touring, which will significantly impact your equipment choices.
A Ski Touring Equipment Guide
Why You’d Need A Touring Setup
The default choice for skis and boots when purchasing ski equipment is ordinarily the downhill alpine models, and for good reason; it’s by far the most commonly used and is what most skiers are after. However, for the ski enthusiast or seasoned professional, having a more versatile option that allows you to cross the boundary into steeper and wilder terrain, you’ll likely need to consider a touring setup.
A touring setup offers maximum freedom and versatility for all-mountain skiers and enthusiasts, with options that don’t compromise downhill performance and allow for uphill ascents. A touring setup will enable you to go anywhere, from carving firm groomers to touring in the backcountry. A touring setup gives you access to it all.
What Is The Difference Between A Touring Setup And Traditional Alpine?
Your traditional downhill alpine setup is designed for precisely that, downhill descents. The toe and heel piece hold the boot, allowing for effective release in case of a crash. The traditional alpine setup, however, doesn’t allow a skier to walk uphill. The touring ski boot and binding provide a similar function for skiing descents but allow the heel of the ski boot to be free for walking uphill. The freedom of the heel allows for a natural walking motion that isn’t possible in a traditional binding. There are variations of touring bindings, though, which we will discuss further. Some offer superb function and safety for descents, while others prioritise weight saving for the lengthy climbs.
Touring Bindings
Low-Tech Pin
A traditional pin binding connects the ski boot to the binding using two pins, both in the toe piece and heel piece. It secures the ski boot in this way, allowing for downhill skiing. The purpose of this design is to reduce weight. With such a minimal design, the weight of the binding is significantly less than a normal alpine model. With such weight savings, skiers embarking on long touring ventures can do so without picking up such a heavy ski with every step. The heel of the boot can, of course, release to allow for a natural walking motion. It’s ideal for those skiers who value efficiency on ascent rather than speed and aggression on the way down. That’s not to say you can’t ski well or fast on a pin binding, but because of the binding’s design, they don’t have the same DIN release setting as a traditional alpine binding would, so many skiers choose not to ski quite as aggressive on a pin binding. These bindings will work as intended with any boot with tech fittings.
Regarding ski boot compatibility, we always recommend checking with a professional ski shop first. There are too many models and variables for us to give you accurate information about your choice of skis, boots, and bindings. So if in doubt, always check with a professional shop to ensure safety and correct compatibility.
For our ski patrol clients, it’s essential to know that you can’t use a low-tech pin binding like these. Patrollers must ski with a binding with standard DIN release settings. Low-tech pin bindings don’t have these. Therefore, you should only consider the hybrid, frame or traditional Alpine models. We also don’t recommend a low-tech pin binding for our AMP clients. It’s important for safety that you’re skiing on a binding that has standard DIN settings.

Hybrid
The hybrid touring bindings are probably the most versatile, and they are the bindings we recommend for our ski patrol and all-mountain program clients. Popular models include the Salomon and Atomic Shift MNC, and Marker Duke. Both of these models feature pin inserts at the toe piece and a mechanism to release the heel, enabled by pulling the heel piece back along the length of the ski. These bindings work like a pin binding when in touring mode. They are a little heavier than the low tech pin bindings; however, the key feature of these bindings is that with just a few clicks, they return to traditional alpine bindings with a full toe and heel piece with the same DIN standards as a traditional alpine binding. This means you can attack your descents with the same speed and aggression as you would with any traditional alpine binding.
Frame
Frame bindings look very much like your traditional alpine binding. A standard toe and heel piece holds your ski boot, and unlike the previous two bindings we’ve discussed, your heel will remain locked in a frame binding. Instead, the entire binding sits on a rail that allows the binding to lift from heel to toe. This is what will enable you to walk uphill. As you might expect, walking is a little less natural and requires a little more effort as you’re pulling the whole binding with you on each step instead of lifting just the heel. Frame bindings are the heavier of the three bindings we’ve looked at, but this does mean they’re generally cheaper. It is ideal for someone on a budget who doesn’t plan to venture on any lengthy tours. I certainly wouldn’t recommend using this binding when heading out on big tours. However, if your idea of touring is to take a short hike to the top of your favourite line and ski hard on the way down, it is a more affordable option.
When Would You Use A Low Tech Pin Instead Of A Hybrid?
It depends on the type of touring you’re planning and how gnarly your downhill descents will be. If you’re heading out on 6-8 hour long treks and not seeking the biggest line on the way down, you’ll value the weight saving you’ll make going with a pin. The hybrid bindings are no problem on a couple of hours’ ascent and will let you rip a line good enough for the freeride world tour on the way down. The best part is these bindings are compatible with regular alpine soles and your touring boots, meaning you could use your current alpine ski boots on days you didn’t plan any touring. You would need a ski boot with pin inserts, though, if you wanted to use the binding in touring mode.
We recommend hybrid bindings like the Salomon shift for anyone on our ski patrol or all-mountain programs. They don’t compromise on downhill performance and offer the most versatility. These bindings also work as traditional Alpine bindings, meaning you’ll only need one setup, saving you £.
With these bindings, you could also use your current alpine ski boots if you’re not yet in the market to change your boots. Bear in mind, though, that you wouldn’t be able to use the binding in touring mode unless your ski boots have tech inserts in the toe. However, they’re a superb binding, and if you do decide to swap into a new boot with tech inserts, these bindings can do both.
Ski Touring Boots
In the same way we make decisions on bindings, our ski boot choices should first consider the type of touring you’ll be doing and how much you value downhill performance. Fortunately, the market has produced some high-quality touring boots over the last few years that offer ski junkies a great product. We’ll look at Alpine boots with tech inserts and the Alpine touring models designed for uphill ascents. These boots are designed for touring, with differences in sole compatibility, weight and downhill performance. For clients of the Winter Sports Company, we recommend the alpine touring boot with tech inserts. They offer great versatility and fit just like your alpine boot, and crucially, they don’t compromise on downhill performance.
Traditional Alpine With Tech Inserts DIN ISO 5355 and ISO 23223 GW
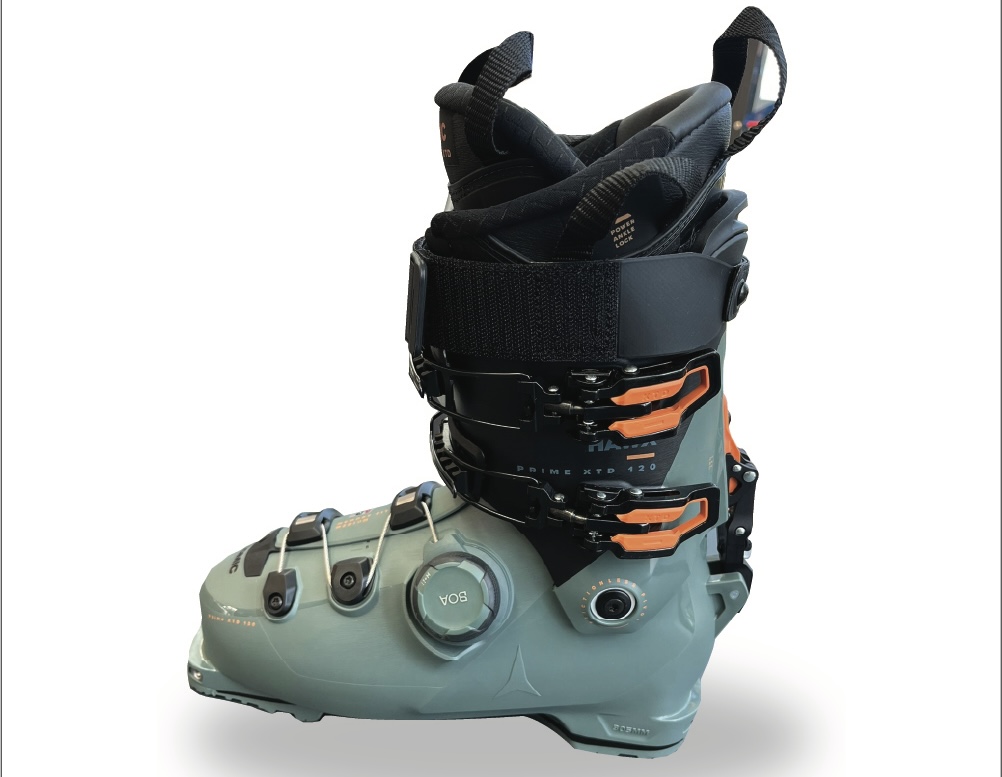
These hybrid ski boots are the go-to ski boot for any all-mountain skier looking for a boot that will do it all. Designed like your traditional alpine ski boot, they provide exceptional fit and performance, often using a 4-buckle. The key difference between these ski boots and your regular downhill boot is generally threefold: first, the ski boots will have tech inserts. This makes the boot compatible with a pin and allows you to walk uphill. The subtle differences in the liner allow for a greater range of motion in the ankle when walking, and walk mode features on the shell help you take a more natural walking motion when touring.
These boots are lightweight, with significant improvement in design over the last few years and don’t compromise downhill performance. These models are often available in 120 and 130 flex ratings, equivalent to a stiff downhill boot. The boots will feel and perform just like your standard alpine boots, but with a few neat features, they can quickly transform into a lightweight touring boot. It is the perfect option for skiers who value downhill performance but want something versatile for a few-hour hike—recommended for ski patrollers and AMP program clients.
Alpine Touring DIN ISO 9523

At first glance, these boots are more typical of what you’d associate with a touring boot. These boots often use a rockered sole and two buckles to prioritise the uphill ascent. Extremely lightweight, allowing a skier to be comfortable for hours on their feet on a lengthy tour. They’re the boot of choice for those venturing on day-long tours over large distances. Compatible with multi-norm and pin bindings. However, these boots are often incompatible with traditional alpine bindings that are not MNC. As previously mentioned, check with a professional ski shop if you’re uncertain about your boot and binding compatibility. Not to say that these boots don’t ski well; they do! You could definitely rip some fresh tracks. However, you would sacrifice a little downhill performance compared to the hybrid alpine boot. You’d notice the difference if you wanted a day ripping on the firm groomers. These boots wouldn’t hold up in the same way.
This is why it’s essential first to establish what your priorities are. For some, the uphill ascent is more important; in this case, these boots are perfect. For many, though, in particular patrollers or all-mountain skiers, the downhill descent is just as important, and you want a ski boot you can rip in the resort on firm snow days.
Touring Skis
Trying to figure out the right boot and binding combination may seem like a bit of a minefield. Fortunately, choosing your ski is a little more straightforward. As an all-mountain skier, choosing an all-mountain or freeride ski that sits between 90 and 100mm wide is a good marker. A ski this wide is the closest you’ll get to a does everything one ski quiver. A ski this wide can still arc a clean turn on piste and shines in the deep stuff. A ski closer to the 90 or 100 mark will determine which of those it perhaps favours. A narrower ski performs better on piste, and a wider ski better on soft snow.
When choosing a ski specific for touring, the ski’s weight becomes a critical factor. A ski full of metal and a heavy wood core certainly performs well for hard-charging descents, but you’ll quickly fatigue on tours over a long distance. Therefore, a super lightweight ski, often without metal and a lightweight woodcore, makes for a perfect touring ski. Combine this with a lightweight pin or hybrid binding and you’re pulling very little with each step. Something in the middle would be the best option for skiers who want a ski that works well in the resort and out of bounds. Choose a lightweight ski with some metal or other material to reinforce it and ensure good performance in the resort. An Instructors Guide To Skis
Ski Recommendations
- Head Kore 93
- Armarda Declivity
- Salomon Stance
- Fischer Ranger
- Elan Ripstick
- Atomic Bent Chetler
- Black Crows Captis
These skis, or similar models, fit the description of being a one-ski quiver both in resort and out of bounds and are ideal for touring and resort riding.
How can I store Skis and boards at home?
Skis and boards should be stored somewhere dry. Many people store them under the bed or in a cupboard. If you want to store them in a garage or boiler room, or on the wall somewhere else, take a look at these wall mounted storage racks or follow this link: Ski Wall Mounts: Hooks, Racks & Hangers | GearHooks. These save space and keep your gear off the floor. They allow any snow or water to fall off and keep the skis or boards dry during storage.
Touring On A Budget
Daymaker Adapter
So, what if you’re new to touring and unsure if you want to drop a heap of £ on new skis, boots and bindings? Fortunately, daymaker touring adapters offer a viable alternative. The key selling point here is that these adapters allow you to use your current alpine boots, skis and bindings. No need to buy any new equipment. A neat little device that clips onto your binding before stepping in with your boot. Using this adapter, the heel of your boot is free to lift and will allow you to walk uphill, assuming you have skins on! So, this is an excellent option for anyone looking to dip their toe into touring or doesn’t have the means to invest in a complete new setup.
It’s worth mentioning that walking uphill over any distance can be uncomfortable because you’re still using your traditional alpine boot without the key features of walk mode and a modified liner. You don’t get the same natural walking motion as you would from a touring or hybrid boot and binding. However, I would say that’s a fair trade-off and still offers a viable alternative in the market.
Other Equipment
Besides skis, boots and bindings, anyone on a touring adventure should have some essential equipment with them. Some are essential to get you going uphill; other bits are for safety when venturing out of bounds or into areas of the mountain where avalanche risk is higher. Here is a list of some additional pieces of equipment you may need for your touring setup:
Skins – Without these, you could have the fanciest, most expensive pair of skis, boots and bindings on the market, and you won’t make it ten yards up the hill. A piece of fabric cut out to fit along the base of the ski, one side with glue to stick to the base and the other side a piece of fabric designed to grip the snow. The fabric allows the ski to slide forwards but not backwards. When buying skins, try to buy a width equal to or slightly narrower than the widest part of the ski. You can then trim and cut the skins to fit the bases precisely to ensure maximum grip.
- Transceiver – A vital piece of equipment anytime you head out into the backcountry. A transceiver can send a signal and also receive one, meaning you can be found if buried in an avalanche and also find someone else if you happen to find yourself in that situation
- Probe – An extendable pole that is used to locate the exact position and depth of someone buried in an avalanche.
- Shovel – A shovel completes the set and is used when digging someone out of the snow. Opt for a stronger material like metal as opposed to a plastic shovel. It’s worth investing in some quality equipment, particularly your transceiver, probe and shovel. You can find cheaper alternatives, but we recommend spending a little more on this stuff.
Backpack – A lightweight backpack to store your shovels, probe, transceiver etc. You may be carrying additional clothing, food and drink and, of course, your skins when not using them.

Some touring backpacks even come with a fitted airbag. The airbag will inflate in the event of an avalanche, keeping you on the surface of the snow instead of being buried. Other pieces of equipment and Everything Else You Might Need For Your GAP Ski Course
FAQs
If your touring bindings are multi-norm certified, then yes, they will work with your current alpine boots. However, your ski boots must have tech inserts in order to be used with pins in touring mode. Your alpine boots won’t work with low-tech pin bindings.
When choosing your binding, you should choose a brake width equal to or no more than 10mm wider than the waist width of your ski. For example, if your ski is 96mm wide, a perfect brake width would be 100mm.
You can reuse skins. They do wear eventually, and you should replace your skins once a year, ideally. If stored correctly you can use your skins for multiple tours before they need replacing.
For a complete setup to include boots, skis, bindings and the other key pieces like your transceiver, probe and shovel, you could expect to pay somewhere between £1500 and £2000.

As Seen In...